Everybody! I made soem super cool masks for my boyfriend and I for Halloween (and the I stayed late at work and missed the party... but we are going to pretend that didn't happen). Ryan was Benny the Spaceman and I was angry Unikitty, both characters from the Lego Movie that came out earlier this year:
I mostly used this instructable (FYI, this is the best site ever!) for a basis for my boyfriend's mask: http://www.instructables.com/id/LEGO-Man-Costume/
For my own, since it was Unikitty, I was able to use a simple cardboard box and some foam shapes from the floral section of Michael's.
I happened to have the right lego blocks in my room to find my dimensions. I really wanted my masks to come out as close in proportion to the actual mini-figures as I could make fit our human bodies.
 |
| 10 mm : 12 in |
 |
| 24 mm : 15 in |
While I waited for my boyfriend to tell me the height of his head (he was on a business trip), I got to work on my Unikitty mask. A Sam Adam's box I had actually fit my head, and had just about spot on proportions. Another bonus: the flaps were the exact width I needed for the ears, so I chopped them off and re-attached them on top.
 |
| Cutting |
 |
| Construction |
 |
| More Construction |
 |
| What does the box say? |
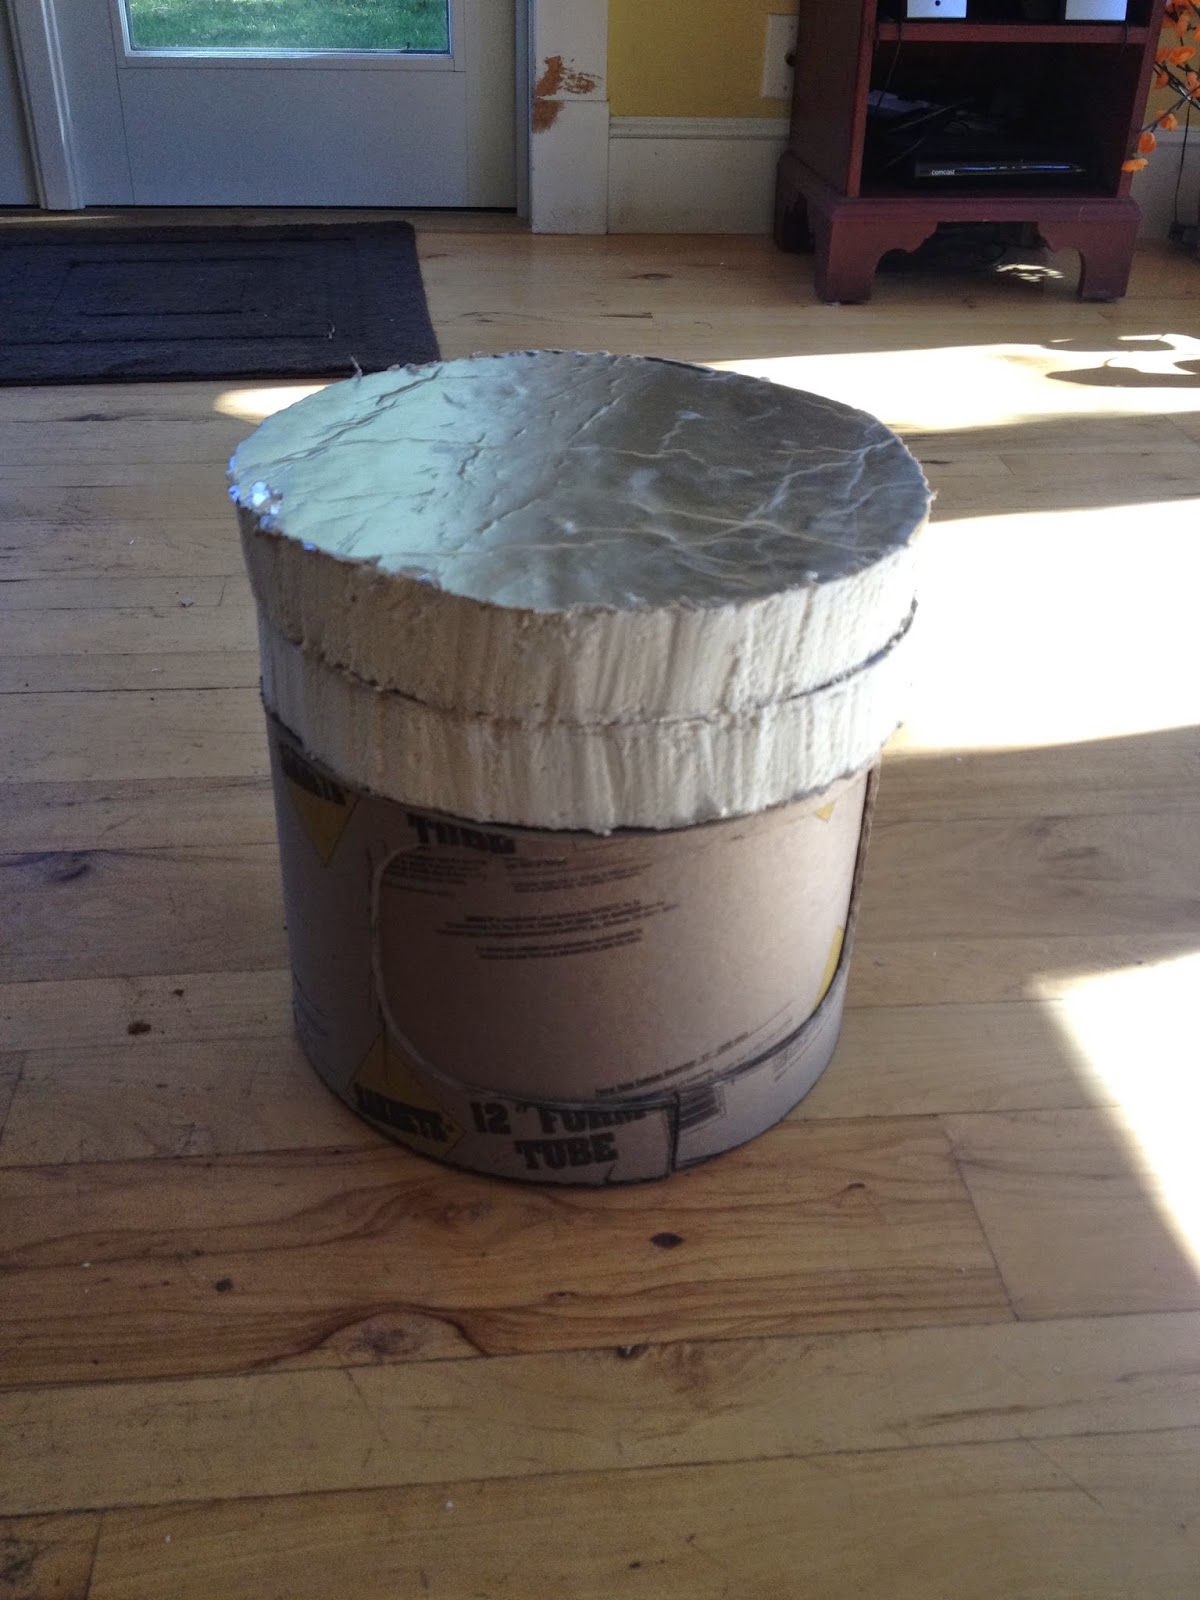
Then it was time for the real work... the benny the space man head! I bought a 12" concrete form, and a 10" concrete form and a 4' x 8' sheet of two inch yellow, foil-backed foam. The plan was to make a lego head from the 12" form, use the foam to craft a removable helmet, and use the 10" form for the jetpacks.
Somewhere in there I was told I was crazy a few times for wanting to make a foam helmet, and my dad gave me the idea to nest concrete form pieces to make a helmet and head all in one. I wish I had thought of it on my own, it worked great! It also helped that this old style helmet is basically a cylinder with a dome on top, so I didn't have to spend extra time making the lower domed part of a lego head. The most time consuming part, sadly, was probably sawing the sections of tube, but eventually I used my Dremel to speed things up, and give my forearms a break. I used three layers to make the helmet, cutting the hole out of each layer before gluing the next in.
 |
| Tracing out the face hole on the outside layer |
 |
| The face hole in the outside layer |
 |
| Cutting off a vertical strip to fit this layer inside the first |
 |
| The outside layer, next to the second layer |
 |
| Realizing I needed to cut a little more off |
 |
| Gluing |
I kept the last piece, for the face, separate to make painting easier.
I cut two circles from the foam to match the 12" diameter tube, to make the rounded top of the helmet. I cut and carved a hole / divot in one of these circles to hold the mask firmly on the wearer's head, a nice distance from the front of the mask. Then I glued the two discs together with spray adhesive.
Next, I had a lot of fun carving the foam to make the general dome shape. I beveled the edge with a drywall knife, and then rounded the bevel with my little ofla. But the best part was just sanding it. Before that step, you wonder if you'll ever have a nice surface, then sanding it is like instant gratification. I have a lot of foam left, and I think it is beckoning to become some awesome sculptures.
 |
| Cylinder, meet dome. Dome, meet cylinder. |
 |
| Detail of head hugging part |
The one thing I would change if I did this again, is the shaping of that dome. I think the dome came out a little flat for my liking, and I wish I would have taken the curvature further.
Due to my uncertainty of whether this foam would take spray-paint, and concerns regarding texture, I decided to seal the foam with wood filler. After the first coat of wood filler, I glued the dome onto the cylindrical part of the helmet. I kind of doubted this would work, but after nesting three pieces of form, the cylinder was 3/8" thick. I scored up the foil around where the glue would be applied, and laid down my bead. There were a few gaps, but I realized the surfaces made good contact with the help of putting a heavy box on top of the dome, the oldest form of clamping. Finally the ugly flat part comes in handy. Once it was done, I also flipped it over and ran more glue into the seam from the inside. I think the extra wood filler used to smooth out this seam on the outside helped further with the connection.
 |
| Close up of scoring |
 |
| Gluing |
 |
| The whole assembly before sanding and paint |
I think I did two full coats of wood filler with sanding in between, and a third just to fill some more noticeable divots. I used my Dremel to rough up the helmet like it is the movie, adding some dents and the crack in the lower portion. I also had read a tip about using glue to seal foam, so I did one final coat of wood glue, over the whole helmet, just to be safe. Then I spray painted. This was my first time using a paint + primer, and I think it's safe to say I've seen the light. I was blown away by how well it worked, since my dome started out quite a bit lighter than the cylindrical portion of the helmet.
 |
| More wood filler! |
 |
| It's just like frosting a fake cake |
 |
| Sanding |
 |
| More sanding |
 |
| Wood glue layer... this was not that fun to spread |
 |
| Dry wood glue layer, look at that shine! |
 |
| Painted! |
I also primed the Unikitty head and painted the lego face at this point.
Then, while things were drying, I worked on the Unikitty horn. I needed to take both masks to my boyfriend's place, 5 hours away, in my miata, so my goal was to make my head collapsable, since I knew his wouldn't be, and at the time I thought I would be making him a set of jetpacks also (ambitious much?). I decided to solve this problem by modifying a PVC fitting to "bolt" the box flaps together (then realized I could have used a twist tie or shoelace to get the same effect, but hey, the PVC is a little more elegant in how it fits into the unicorn horn, so boo to those simple ideas!). I drilled two perpendicular sets of holes through the threaded part of the PVC fitting, and traced and cut the arch shapes out on the flaps of the box. I cut some 1" floral foam into a 4" diameter circle, and cut 1/2" foam into a slightly bigger circle, then added a foam cone. I attached these with wood glue and covered with the wood filler for a smoother texture. The PVC fitting was just shoved into the bottom of the horn assembly for a friction fit.


I glued the yellow face into the blue helmet, and while it was drying, sketched out the Unikitty angry face. I used the eyebrows for my eye holes, since her face doesn't really fit human eyes. I painted the Unikitty head and the accompanying horn.
For the helmet, I came back in with glue and glued the bottom of the helmet as skewed as I could get it, to match the detail from the movie. When the helmet was done gluing, I sketched the Benny face on. Cutting the face out was very difficult and frustrating (oh, and it was 2 am, the night before Halloween...). I used my olfa knife to score the spray paint, so it wouldn't peel or crack, then I cut with a combination of that and the serrated dry-wall knife. The serrated knife probably worked the best, but I couldn't do very tight radii with it.
I used a sharpie to color around the tongue, and to blacken the inner edges of the facial features. I painted the tongue red. Finally, I duct-taped black fabric to the inside to blacken-out the eyes and mouth.
Here they are! There was more to my costume, but I never got suited up. Ryan made his box lego shirt!
Ok, I'm kind of over halloween now. I'm sure we all are.